Karen Krogg, M.S. CCC-SLP
Welcome to my AAC blog. Just Plug it in was my first post. Today we will explore the AAC evaluation. While I’m certainly still in the learning process myself, I’ve decided to share my journey with you in the hopes that it will be helpful and make the jump into AAC seem less overwhelming.
The first thing I did was call the AAC consultant in my area with the device company I’d chosen after researching the options so that we could set up a meeting date/ time. I also found out some other paperwork and information I’d need (things like a script for a SGD evaluation from the doctor, checking what insurance the patient/ student has, etc.)
Well, let’s back up a second here. The very, very first thing I did was discuss everything with my kiddo’s parent. I mentioned this as an option, and asked if they were willing to find out more. I gave them as much information as I was able to give, and it was very helpful I’d already been to continuing education (in my last post, I highly recommended going to a LAMP training). Since my kiddo’s parent was on board, it was time to get things going. I even provided my kiddo’s parent with information on the same CEU course I went to- parents can go to this training as well.
On the day of the evaluation, my patient, patient’s parent, and the lovely AAC consultant I’d been in contact with (Monica at PRC) arrived and we got down to business. My patient’s parent and I filled Monica in on some pertinent background history, and the goals and activities we’d been targeting speech therapy sessions. Monica immediately asked: What’s motivating for (child)?”
This particular kiddo was very motivated by toys in my room such cars, Potato Head, and puzzles.
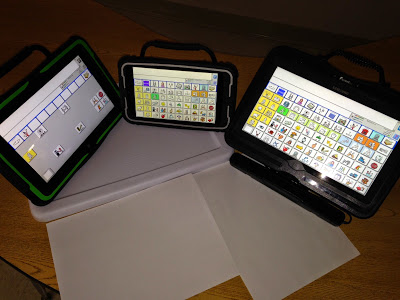
Monica pulled out different device options and we set them out on the table. For this kiddo, it wasn’t a hard process for Monica, my kiddos’s parent, and myself to rule out which device would be the best for him/her, due to the weight of the product and screen size. Here’s a picture to show you a sample of some of the devices considered.
 PICTURE OF DEVICES CONSIDERED: From left to right: Accent 1000, Accent 800 and Accent 1200.
The device that immediately stuck out to us was the Accent 1000. The kiddo was able to grab it and carry it across the room to set it on the kid-sized table with ease. It weighs approximately 3 lbs- but is a LOT tougher than you’d think. These devices are not fragile, believe me. From what I understand, the Accent 1200 (the largest and heaviest of the devices compared) might be a better choice for a child who’d need it mounted on a wheelchair. Of course, screen size would still have to be considered as well.
Monica then had my kiddo play a “Chase Me” game on the screen- which was actually a sneaky way for us to tell how many icons per page would be best for him/ her. This kiddo did best with 60 icons per page. I have some other children with devices that are 84 items per page. I think the biggest misconception many adults have is this- “It’s too visually overstimulating!” or “It’s just too much! How will they ever find the correct icon with that many icons per page?”
If you’ve shared those same concerns, then hopefully I can explain what I’ve learned through this whole process and through LAMP training. Meaning well, we often think, “I’ll start this kiddo with a device that offers him 8 choices to choose from. Once he learns those, maybe he’ll be ready for more pictures. Now we’ll try 12.” The problem here is this… you are literally asking him to learn a new system and develop a new motor pathway each time you change it up on him. Think of your keyboard… if the letters changed each time, how easy would it be for you to learn typing? If you’re like me, typing is pretty automatic. You don’t have to think about it. It’s fast and efficient (if not, maybe you didn’t take the Mavis Beacon course my dad made me take in the ’90s!)
Since this device is going to be this child’s voice, they need a system that will
* grow with them AND
* always, always, always remain the same.
The other thing is this- you can use Vocabulary Builder on these devices to help children first start with the core vocabulary needed and then work your way up. It won’t be as “overwhelming” and the pathways will still remain the same.
Let me also just throw this in on the difference between 60 and 84 icons per screen. As I’ve explained, a motor pathway will be the same for each vocabulary word accessed. Therefore, it might take a child 2-3 hits to access a certain vocabulary icon on the 60 screen (since there are fewer icons on the home screen), whereas a screen size of 84 might mean fewer hits to access that same vocabulary. Both, however, are going to provide that child with access to an adult-sized vocabulary of thousands of words. Do you see how it’s possible now for this device to “grow” with the child as his/ her language develops? Hopefully I’ve explained it clearly!
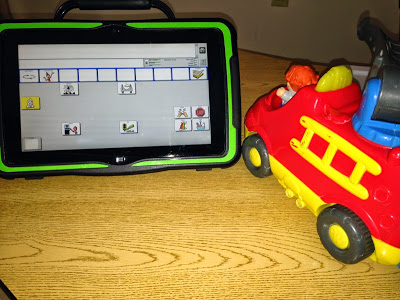
We of course had to try out the device with our kiddo. We masked some icons on the screen, and showed some core vocabulary. We got out one of our kiddo’s favorite toys and he/she had a BLAST. It seriously didn’t take this child long to figure out that each time she selected “go”, I was going to move the fire truck in crazy zig zags across the table until she told me via the device to “Stop!” She also figured out pretty quickly that instead of crying and crawling across the table, she could simply ask for that motivating Mrs. Potato Head (yes, I own the lady version in my treatment room) using words “want” and “more”. By this time, mom was crying tears of joy. “I’ve never seen him/her do that,” this parent said. It’s a moment that has given me the chills, time and time again… because it’s happened during every.single.evaluation I’ve done so far.
Previously, their child did not have the means to communicate and so… it was assumed that he/she simply could not. Suddenly, the doubt has lifted (if there was any) from the parent as they begin to see the possibilities. It’s an exciting and amazing experience, and makes me proud to be in this field.

Pictured: We enjoyed playing with the fire truck toy during the evaluation and making it “go” and “stop”.
You will of course have to consider other things, and the child will teach you ALL you need to know during the evaluation.
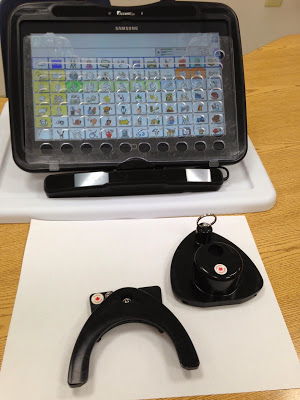
What’s the best way for this child to access his/ her device? There are so many options out there, from simply pointing with your finger to activating a switch. You’ll also need to figure out things like… is a mount needed? This may be the case if the child you are evaluating is wheelchair-bound. The child will need a way to have easy access to his or her voice. There’s also the fact that some kids need a keyguard or touchguide.

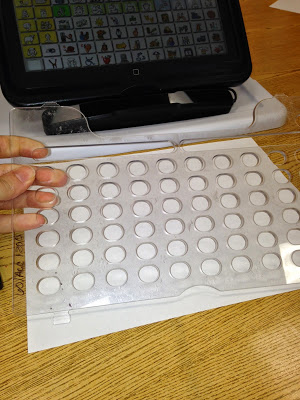
PICTURE OF DEVICE WITH TOUCHGUIDE
 Touchguide
Monica explained to me the purpose and difference of a keyguard and a touchguide. I’m not quoting word for word, but here’s my best explanation of what she told me. Both accessories provide a visual and tactile cue that fit over each key. A touchguide (pictured), however, has a flatter surface and only covers the center of the key. A keyguard, Monica explained, leaves the best center space of each key open for touching and allows a flat profile to the rest of the board to decease the occurrence of miss hits and swiping movements. I don’t have a picture of one today, but I do have a few kiddos that have keyguards on their devices, so I will get one.
My kiddo demonstrated perfectly that he/she understood that this device was to be used communicatively during the evaluation. In fact, he/she actually, after some guiding assist and models, was able to spontaneously select the vocabulary targeted during activities. Basically, the evaluation time was spent figuring out 1) which device is most appropriate for this child, 2) how many icons is best for this child, and 3) what accessories were necessary for this child to use his/ her device successfully.
Next up, I’m going to share tips and tricks I’ve learned from the next big step in this process: writing the report. Please be sure to check back soon!
Note: I am not an employee of Prentke-Romich Company (PRC) and am not receiving financial reward for writing about them or their products/ training in my post.
To read more by this amazing SLP – visit her blog The Pedi Speechie
There are no comments yet. Be the first to post!You must be logged in to post.
Making AAC Work


